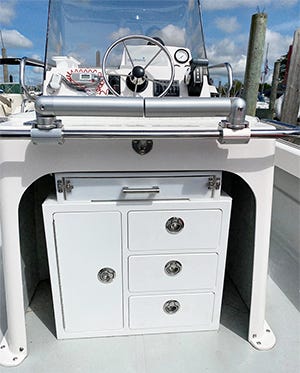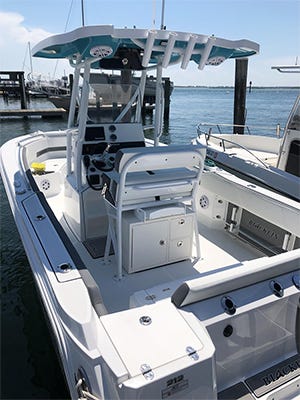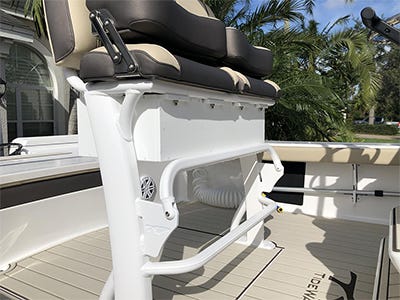

Most of Boat Outfitters’ Starboard storage units fall into one of two basic types: recessed units, which are mounted in a cutout in a vertical panel with only the frame and door visible, and freestanding units, which are designed to be mounted to decks, bulkheads, leaning post legs, etc.
Freestanding vs. Recessed Storage Units
Installing recessed storage units is generally a more involved job since a large cutout is required. Once the cutout is made, though, the process is relatively cut-and-dried. Recessed units come with mounting holes pre-drilled, so all that’s left is to mark and drill matching holes in the mounting surface, apply a bead of sealant around the frame of the unit, and install your fasteners.
Freestanding units don’t require a cutout, so installation can be as simple as drilling four holes and tightening your fasteners.
The difference is that there’s a great deal more variation in installing freestanding units. They aren’t supplied with pre-drilled holes, so customers need to determine the number, size, and location of fasteners. And in certain applications, such as units that mount to the underside of an aluminum leaning post, additional steps may be necessary.
Every installation is different, but here are some guidelines and recommendations for freestanding tackle centers and other storage units:
Installing Freestanding Units
Except in the case of units that are mounted to the underside or legs of aluminum leaning posts, most freestanding units are mounted from inside. Most often, they are fastened through the bottom to the deck or sole, but sometimes they are fastened through the back and/or sides to a bulkhead or other vertical surface.
Basically, installation consists of positioning the unit where you want it, removing drawers and trays as needed for access, drilling holes through the bottom (or back or sides) of the unit and into the mounting surface, and installing fasteners.
Mounting Location
When choosing a mounting location, always check carefully for wiring, fuel lines or tanks, plumbing, control cables, bracing or anything else behind the proposed mounting location that could be pierced or otherwise damaged by drill bits or fasteners. The deck beneath the leaning post — a popular mounting location for freestanding tackle units — is especially likely to have rigging or fuel tanks underneath it.
If you can’t see behind the mounting area and you own a newer boat, it’s worth contacting the manufacturer to ask where it’s safe to drill. Otherwise, consider drilling a small opening for an inspection camera. If the camera inspection is inconclusive, you may be able to install a deck plate nearby for a better look. As an added benefit, a deck plate can provide access for through-bolting.
Finally, always check clearance for doors and/or drawers before finalizing your mounting position. It’s easy to get caught up in other concerns and forget to make sure the unit can open fully.
Positioning Fasteners
Freestanding storage units are not delivered with pre-drilled fastener holes, so you’ll need to determine how many fasteners to use and where to locate them. As a default for mounting a storage unit to the deck, you’ll want four fasteners — one near each corner.
Beyond that, you’ll need to use your judgment, taking a number of factors into consideration:
Overall size — Obviously larger, heavier units call for more fasteners and/or larger fasteners.
Height — For units that are attached only through the bottom and not supported elsewhere, shape is a factor. Taller, skinnier boxes exert more force on fasteners than shorter, fatter boxes.
Location — The farther forward you mount a unit on your boat, the more of beating it will take. A box forward of the console on a fast offshore fishing boat needs stronger mounting hardware than a box in the cockpit.
Fastener type and size — The stronger each fastener is, the fewer of them you’ll need. Through-bolts are stronger than screws, and larger screws are stronger than smaller screws. See additional information below.
Some customers use six, eight, or more fasteners to install large freestanding storage units.
Bolts vs. Screws
Through-bolting is always the preferred method, but it’s sometimes not possible. If you do through-bolt, 1/4”-20 bolts are a good choice. Use lock nuts and fender washers on the bottom/back of the mounting surface to spread the load.
Through-bolting is always the preferred method, but it’s sometimes not possible.
If through-bolting is impossible, use #12 or #14 self-tapping screws or, better yet, 1/4” stainless steel lag screws. If mounting to cored fiberglass, use screws long enough to penetrate all the way through the laminate for maximum strength (assuming there’s nothing behind the mounting surface that could be damaged).
With either through-bolts or screws in cored fiberglass, it’s best to dig out some of the coring between the two fiberglass “skins” and replace it with epoxy to form a plug. This strengthens the laminate against crushing, provides more for self-tapping threads to bite into, and seals the coring against water intrusion.
Fastener Heads
On our recessed units, where the fastener heads are visible, we pre-drill and countersink mounting holes for use with flathead or oval head fasteners. But on freestanding units, fastener heads aren’t visible, so maximum strength is the only concern. We recommend truss head bolts or self-tapping screws, since the wide, flat head shape spreads the load. Panheads are fine too if you can’t find truss heads in the required size. Lag screws typically have hex heads, which are also suitable.
Deck Clearance
Whether you mount your freestanding unit directly to the deck or slightly above it on Starboard feet is a matter of preference. Units are made with flat bottoms, so raising them requires either placing a custom order to have feet added, or fabricating and installing your own feet before installation.
Mounting a unit directly to the floor provides an arguably cleaner look and saves time on installation, but the area under the unit can’t be accessed for cleaning and tends to trap grime and moisture.
A good bead of sealant around the base can serve to keep grime and moisture out. Raising a unit slightly lets air and water flow freely under the unit and allows for cleaning.
Sealants and Sealing
All penetrations of cored fiberglass must be carefully sealed, but holes in the deck are especially prone to water intrusion. Again, digging out some coring around your fastener holes, using epoxy to create a waterproof plug, and then re-drilling the holes is the best method, although not strictly necessary. Otherwise, fill holes with a quality marine sealant before installing fasteners.
Keep in mind that no sealant adheres well to Starboard, meaning your fasteners will have to all the work of holding your freestanding unit in place. If you do want to apply sealant under the bottom of your unit or around its edges, we recommend elastomeric sealant, which works better with Starboard than others.
Suspended Mounting
Not all “freestanding” storage units are actually meant to stand, per se. Some are designed to be mounted to the underside or legs of an aluminum leaning post, leaving room under the storage unit for a cooler. These installations can be more involved, usually requiring removal of the leaning post cushions or even the addition of welded tabs or brackets in some cases.
Through-bolting
Generally, though, it’s possible to simply through-bolt these units to the aluminum frame of the leaning post. Many leaning posts already have mounting pads or tabs of flat aluminum stock used for attaching the cushion. These can be used to mount storage units too.
If you don’t have mounting pads, the preferred method is to drill mounting holes all the way through the top and bottom of the tubing and into the top of the storage unit.
Working Around Cushions
One common issue arises when cushions are attached from below. You can remove the cushion to install the storage unit, but once the unit is in place, you no longer have access to reinstall the cushion.
The workaround for this is to use jam nuts. With the cushion removed, drill your mounting holes through the tubes of your leaning post. Then drop long bolts or machine screws through the holes and thread jam nuts onto their ends from beneath to lock them in place. This effectively turns the bolts into studs.
Now reinstall your cushion and mark and drill holes in the top of the unit for the studs to pass through. Finally, install washers and nuts on the ends of the studs from inside the storage unit.
Having the jam nuts between the bottom of the leaning post tubing and the top of the storage unit creates a small gap. If this is an issue, you can always counterbore the top of the storage unit to make room for the nuts.


