If you’ve never heard of a SeaCamper, you’re not alone. Only a few hundred were built back in the 1970s during the heyday — such as it was — of trailerable houseboats in the U.S. Like the similar Land N’ Sea Trail-a-cruiser, the SeaCamper was billed as a combination houseboat and travel trailer that was just as much at home backed into a site in a state park campground as beached in a quiet cove somewhere.
Contents
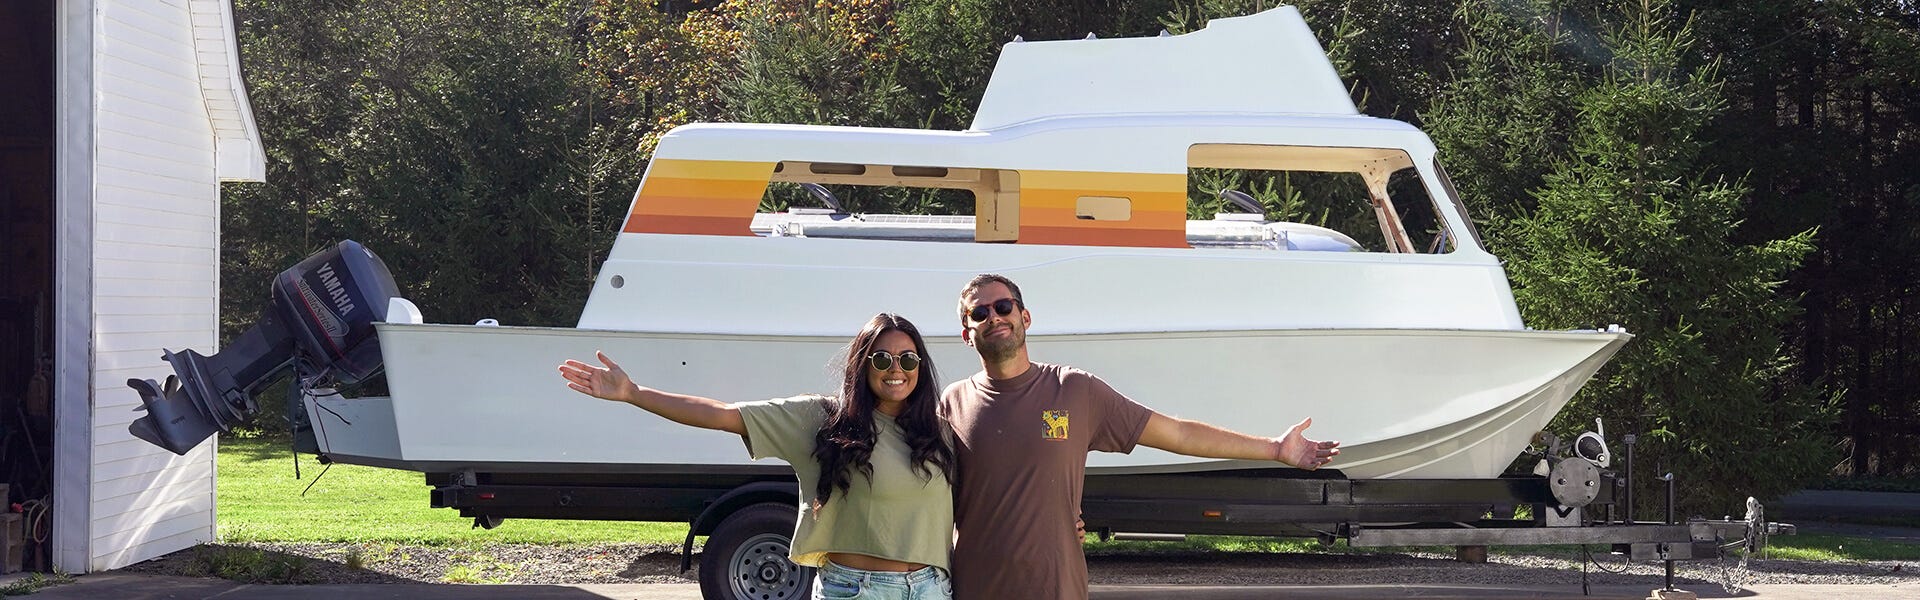
A Labor of Love
Although its utility as an RV was a bit limited, the 24-foot SeaCamper, designed by noted marine architect Otis C. Borum, was a surprisingly capable boat, with a beefy hand-laid hull, a 22˚ deep-V bottom, plenty of freeboard and a not-unattractive sheer line. In profile, from the rubrail down you could mistake it for an early offshore center console.

The original base power package, a 190 hp I/O, delivered a top speed in the mid-30s.
Sadly, most of the 300 or so SeaCampers built are gone now and many of those still in existence are slowly disintegrating in pastures, barns and side yards.
Restoring one is a big, messy job, and even a fully restored SeaCamper is never going to have the value or cachet of something like a restored Boston Whaler or Mako of the same vintage.
In other words, a SeaCamper renovation is a labor of love.

‘It Just Checked All the Boxes’
Enter Danielle and Tommy, the creators behind “Slow Car Fast Home,” a popular Instagram account chronicling their RV renovations and subsequent RV travels throughout North America.
Creative and meticulous, the pair aren’t scared of the labor aspect of a labor of love.
They’ve gutted and rebuilt a 1992 Toyota Odyssey motorhome and then a 1973 Airstream trailer and lived on the road full-time since 2017.

The Places We've Been
In a lot of the places they traveled — Alaska and the Pacific Northwest, Florida, Baja California, Nova Scotia — they found themselves sitting on the shore thinking how many more places they could go and how much more they could see if they could get on the water.
Around 2020, Tommy saw a SeaCamper for sale in Florida and knew he wanted one. Part RV and part boat, it could serve as a home on the road but also take them far beyond the beach. “It just checked all the boxes that I wanted for a boat,” he says.

In early 2023, while they were camped on a beautiful Baja beach watching boats putter around the picturesque islands in the bay, the right SeaCamper came up for sale.
Understanding the Project
It still needed a huge amount of work, of course, which is exactly what Danielle and Tommy were looking for. “The previous owner was up-front about it having rotten stringers and flooring,” Danielle says. “He had already done a lot of the really awful work like digging out the old flotation foam, but we knew we were getting into about a year-long project. We look for projects that are going to be full restorations. Neither of us want to be the people that tear apart a collectible that’s in perfectly fine condition.”

“We love to see the ins and outs of what we’re going to be traveling in. We’re touching every inch of this boat, so we’ll know how to fix it if anything goes wrong.”
Knowing the Ins and Outs of the Boat
Because the pair gravitate toward remote, off-grid experiences where self-sufficiency is critical, doing full rebuilds of their equipment provides another advantage.
“This way,” says Tommy, “we can see how the boat is made. We love to see the ins and outs of what we’re going to be traveling in. We’re touching every inch of this boat, so we’ll know how to fix it if anything goes wrong.”
The project is being chronicled on the Instagram account “Slow Boat Fast Home” as well as on the “Slow Car Fast Home” YouTube channel.

Choosing the Right Coring Material
After re-gelcoating the hull, repainting the superstructure and restoring the aluminum pipework during the summer and fall, it was time to tackle the interior.
First up were the stringers underneath the cabin sole, which had originally been 3/4” plywood encapsulated in hand-laid fiberglass.
The plywood had long since rotted, and the previous owner had already removed it, leaving only the fiberglass “shells.”
Coosa Board over Plywood
Danielle and Tommy considered both marine plywood and Coosa Bluewater 26 composite board as coring for the new stringers. Ply was less expensive and a known quantity, since they had worked extensively with it on their RV projects. They settled on Coosa though, for its lighter weight and imperviousness to rot.
Coosa is widely used by both boat manufacturers and DIY builders for coring stringers, bulkheads, transoms and other structural elements.
It’s also found in modern RVs; today’s Airstream trailers use Coosa as a subfloor.
Composite and fiberglass were relatively new materials for Danielle and Tommy, who had done only a small amount of fiberglass work on their first RV rebuild.
Composite and fiberglass were relatively new materials for Danielle and Tommy, who had done only a small amount of fiberglass work on their first RV rebuild. That didn’t faze them though. “We just have a lot of experience working on projects like this,” Danielle says, “so if we don’t know how to do something, we know how to figure it out.” In this case, that meant lots of online research, especially watching YouTube videos and reading the internet boating forum The Hull Truth.
Cutting and Laminating
After cutting out the remaining fiberglass from the old stringers and cleaning up the bilge where the new stringers would go, the next step was making wood templates for the stringers and cardboard templates for two bulkheads that also needed to be replaced.
“We really care about doing good work and not messing up,” Danielle says, “so we did a lot of templates to make sure we got everything as perfect as we could before cutting the Coosa.”
They then traced the templates carefully onto their Coosa sheets and cut the parts out with a table saw for simple shapes like stringers and a jig saw for more complicated shapes like bulkheads, which had to follow the contours of the hull bottom.
There were a couple of clear takeaways from this step:
1.) Wear a mask when cutting or sanding Coosa and
2.) Use carbide blades and bits for faster, smoother cuts. With the right tools, though, Danielle and Tommy say they found that Coosa is actually easier to work with than plywood.
Bonding the Coosa to the Hull
For bonding the Coosa stringers and bulkheads to the hull, Danielle and Tommy used polyester resin thickened with milled glass fiber and fumed silica to create peanut-butter consistency.

They had initially planned to use epoxy resin for the layup, but by the time they got to the stringers, it was cold in their Pennsylvania workshop and they decided to use poly instead, which cures faster and costs less.
To hold the stringers in place while the thickened resin cured, they used spacer boards that kept the stringers vertical and correctly spaced.
For bonding the stringers to the hull, Danielle and Tommy used polyester resin mixed with milled glass fiber and fumed silica to create peanut-butter consistency.
Fiberglass Layup
For the layup, Danielle and Tommy went with five layers of 1708 biaxial fiberglass.
They first made fillets with thickened resin between the sides of the stringers and the hull to create a curve rather than an angle.
Because the sections of stringers that needed to be replaced were nine feet long and Coosa comes in 8-foot by 4-foot sheets, they created a “sandwich” joint in the middle of each stringer and also used fillets to eliminate sharp angles around the joint. They then pre-wetted their strips of 1708 with resin before laying them along the stringers.
With the stringers and bulkheads glassed in place, the next step was positioning and securing the under-deck freshwater tank, pouring flotation foam and installing the cabin sole. We’ll show you how that went next time!