Tips for Installing a Boat Washdown Pump
February 27, 2024 8 min read
A raw water washdown pump is one of those things that, once you have it, you’ll wonder how you ever got by without it. Sure, you can use a deck brush and a bucket to clean mud, fish blood and assorted other messes off your boat while on the water. But simply hosing them off with high-pressure spray makes an unpleasant task way easier. Fortunately, adding a raw water washdown system to your boat is not only relatively affordable but well within the capabilities of most DIYers. Every application is different, so we can’t offer step-by-step instructions, but here are some guidelines and considerations for installing a washdown pump on your boat.
Contents
Connecting Your Pump to a Through-Hull
Your washdown pump needs to pull in raw water via a through-hull fitting. You can either connect its intake hose to an existing through-hull or install a new one. All else being equal, the less holes you have in the bottom of your boat, the better, so try to use an existing fitting if possible.
Through-Hull Connection Options
On larger boats with raw water heads, you may be able to tee off the through-hull for the head. On most smaller boats, the only option besides installing a new through-hull will be the through-hull for your livewell pump. Never connect a washdown pump to a through-hull that supplies water to your engine(s) or air conditioning/refrigeration systems.
Livewell Through-Hull Options
If using a livewell through-hull, you have two options. The simpler is to purchase a so-called “dual outlet” or “dual port” livewell pump. These pumps have both the usual outlet that carries water to the livewell and a second outlet, upstream of the pump, that can be connected to a washdown pump. With a dual outlet livewell pump, you can add a washdown pump without modifying your existing bronze through-hull plumbing at all.
However you choose to plumb your washdown pump, you should always have a quality bronze shut-off valve on every below-waterline intake.
The more involved — but arguably better — option is to install a bronze ‘Y’ or ‘T’ fitting to the seacock on your existing through hull, with the livewell pump on one “branch” and the washdown pump on the other. Installing a shut-off valve between the Y and each pump allows you to shut off water to either system while still supplying water to the other. This not only provides another layer of safety but can also be convenient in certain situations.
However you choose to plumb your washdown pump, you should always have a quality bronze shut-off valve on every below-waterline intake.
Where to Mount Your Washdown Pump
Finding the best location to mount the washdown pump itself is the next step. Washdown pumps — particularly diaphragm pumps — need to be mounted to a rigid surface. Do not mount your pump on anything that can flex or vibrate. Remember that washdown pumps can be mounted in any orientation, not just on a horizontal surface. Vertical bulkheads often make good mounting locations.
Washdown pumps should also be mounted where they won’t be submerged. Most pumps are fine to mount in a wet location like the bilge, but they should be above the typical water level in the bilge. An occasional splash or slosh is fine; immersion is not.
Washdown pumps “push” water better than they “pull” it, so you’ll want to mount your pump as low in the hull as possible without risking immersion and as close to the through hull as possible. The shorter the length of the hose from the through-hull to the pump and the less the vertical distance between the through-hull and the pump, the better your pump will perform.
Accessibility Considerations
Also think about how you’ll get water from the pump to where you want it on deck. Again, the length of the hose run and the vertical distance between the pump and the outlet will affect the pressure you get at the nozzle of your washdown hose, so the closer the better.
The distance between through-hull and pump is more important than the distance between pump and outlet, but both affect performance.

The length of the hose run and the vertical distance between the pump and the outlet will affect the pressure you get at the nozzle of your washdown hose.
You’ll also need to think about access. You’ll obviously need to be able to reach the proposed location to install the pump in the first place, but you’ll also need to be able to get to the pump without too much trouble to inspect and replace hoses and fittings in the future. Likewise, make sure your hose runs are reasonably accessible. You’ll need not just to run the hose from point A to point B but also to support it along its length.
Finally, keep in mind that you’ll need to run a 12V circuit from your power distribution panel or battery to the pump. Shorter runs are better, but longer runs can be compensated for with larger gauge wire. Either way, think about how you’ll route the wiring from the panel or battery to the pump.
Wiring a New Washdown Pump
You might think a washdown pump and a bilge pump would draw a similar amount of current. That’s not the case; washdown pumps tend to use considerably more amperage than bilge pumps. Many 12V washdown pumps draw 10 amps or more, meaning you’ll want to put a little more thought into wiring them.
Your washdown pump should be wired on its own dedicated circuit with an ON-OFF switch and an appropriately sized circuit breaker or fuse per the manufacturer’s recommendation. Often this will be a 15A or even 20A breaker or fuse.
Although you may be able to get away with smaller wire, there’s no good reason to use smaller than #10 AWG for a washdown pump.
Also follow the manufacturer’s recommendations on wire size. That being said, although you may be able to get away with smaller wire, there’s no good reason to use smaller than #10 AWG for a washdown pump. Longer runs and more powerful pumps may even call for #8 AWG.
Always use tinned marine wire and heat-shrink crimp connectors and terminals.
Plumbing Your Washdown Pump
There are typically three different sections of hose associated with a washdown pump: the hose that runs from the through-hull fitting to the pump, the hose that runs from the pump to the “spigot” or deck fitting, and the hose that runs from the deck fitting to the nozzle. The first two, which are usually out of sight below decks, should be reinforced PVC tubing. Shields 162 hose is commonly recommended. In any case, the hose should have a burst pressure of 100 psi at minimum.
Most washdown pumps are compatible with either 1/2” or 3/4” hose. Many are supplied with adapters for both hose sizes. Keep in mind that inside hose diameter has a direct effect on pressure at the nozzle. Bigger hose equals more pressure. Use 3/4” wherever possible.
When routing hoses, avoid loops or low spots where water can collect, especially in cold climates where trapped water could freeze.
All barb connections should be double-clamped with stainless steel hose clamps turned in opposite directions. Hoses below decks should be supported appropriately with plastic or metal clamps or hangers. A common recommendation is to support the hose every 18 inches. When routing hoses, avoid loops or low spots where water can collect, especially in cold climates where trapped water could freeze.
An inline strainer between the through-hull and the pump is required to protect the pump from damage from grass, sand, pebbles and other debris that might be sucked into the through-hull. Many washdown pump “kits” are supplied with strainers. Otherwise, select an aftermarket stainer. Either way, make sure the strainer is accessible for inspection and cleaning.
Washdown Hoses and Deck Fittings
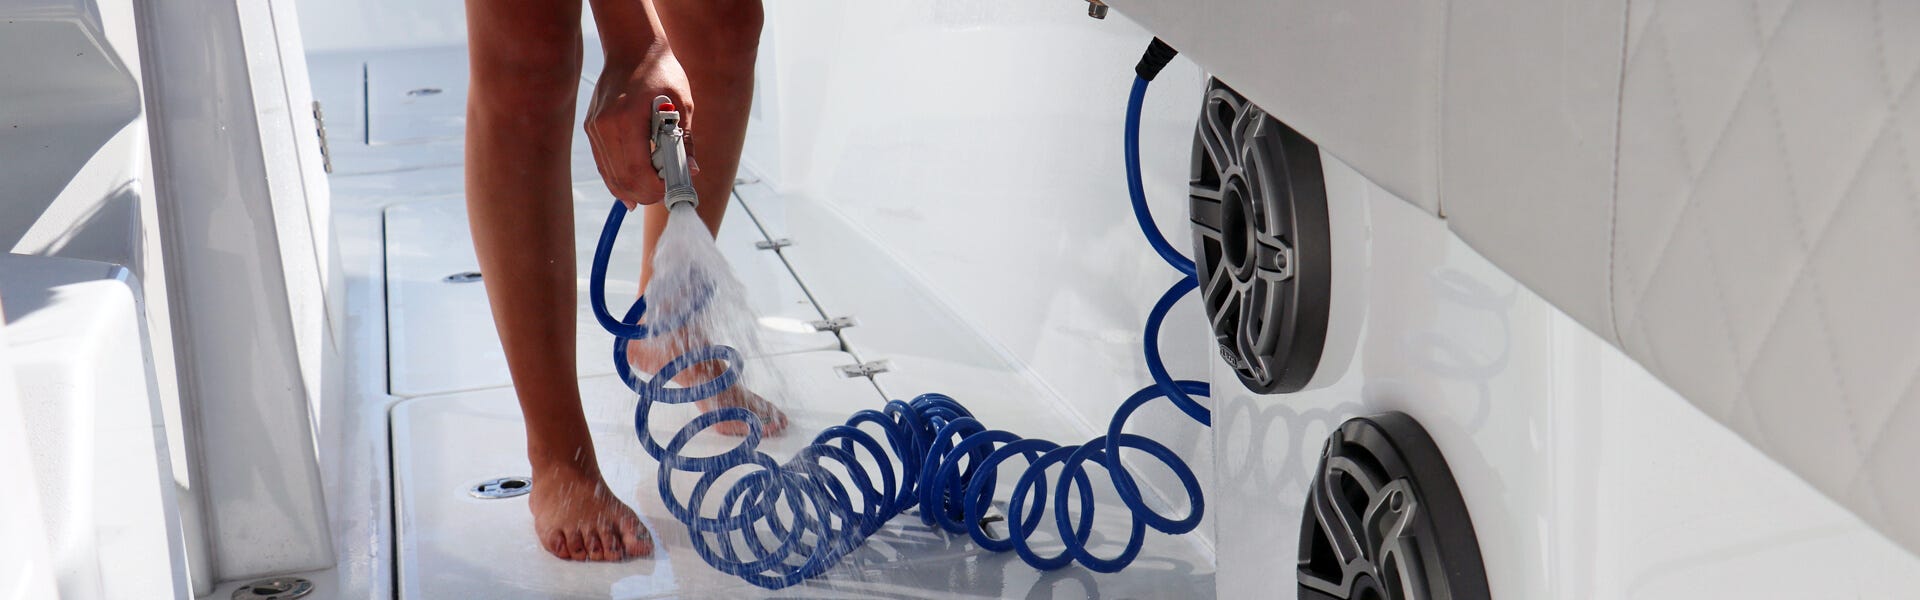
The section of hose that’s on deck is commonly referred to as a washdown hose. It can be anything from a simple garden hose to a compact, self-coiling hose built just for the purpose.
Self-coiling hoses are nifty looking and easier to store, but they tend to have smaller inside diameters than regular garden hoses, which translates to less pressure.

Additional length also reduces pressure at the nozzle. Make sure you choose a hose long enough to reach where you need it (including the bow for hosing off muck from your anchor), but try not to go longer than you need.
In certain installations, the washdown hose is connected directly to the pump, but in most cases, a hose runs from the pump to a convenient location in the cockpit (or at at the bow) where it ends in a fitting of some kind, usually mounted to a vertical surface. Then the washdown hose is connected to that deck fitting. Deck fittings are usually not included in washdown pump kits.
Deck Fitting Options
There are a number of options on the market for these deck fittings. The easiest and most affordable is a simple plastic outlet. The hose from the pump connects to a barb fitting on the back, and the on-deck washdown hose connects to a male GHT (garden hose thread) on the front. A small twist handle shuts off flow if desired. Also available are higher-end stainless steel faucet-style fittings that function much like a hose bib on the exterior of a home.

Both of these styles use standard garden hose threads to attach the washdown hose and both have the drawback of extending out past the surface they’re mounted to. This isn’t an issue when mounted under a gunwale or in another recessed area, but it can be a problem if the outlet is somewhere it can be bumped into or kicked. Likewise, for outlets mounted on horizontal surfaces, such as the bow deck, a fitting that protrudes above deck creates a hazard.
For outlets mounted on horizontal surfaces, such as the bow deck, a fitting that protrudes above deck creates a hazard.
For applications where a flush fitting is required, several quick-connect styles are available. These feature a male connector that attaches to the end of the washdown hose and a female connector that sits flush with the deck or bulkhead where it’s mounted. This style of fitting has the added benefit that the washdown hose can be quickly and easily detached for storage.


