Installing a Cooler Slide Under Your Leaning Post
January 19, 2023 7 min read

Problem: Your hand slowly going numb while you dig blindly through the ice in a partially opened cooler under your leaning post for that last decent beer mixed in with your brother-in-law’s Natty Lights.
Solution: A cooler slide, which allows you to easily pull even large, heavy coolers out from under the leaning post so you can fully open the lid and see directly down into the cooler to find that beer.
Joking aside, cooler slides offer several other advantages besides making it easier to find the last good beer. They also make it easier to load ice and large items like chum blocks and gallon jugs and to remove heavy coolers from the boat at the end of the day. They let you slide the cooler out easily for additional cockpit seating, and, in most cases, allow the cooler to be slid further up under the leaning post when it’s not in use, yielding several inches of extra deck space.
Contents
Choosing the Best Cooler Slide for Your Application
Once you’ve made the decision to invest in a cooler slide, the next step is figuring out which one you need. If you go with a Boat Outfitters cooler slide, there are three different sizes to choose from. All three are adjustable both width-wise and depth-wise to provide a snug, custom fit. Between the three sizes, they can accommodate virtually any cooler from 17” to 49” wide and 11.5” to 20.5” deep.
Note that there is some overlap in width between the Medium size, which can handle coolers from 18” to 41” wide, and the Large size, which can handle coolers from 33” to 49” wide. The depth measurement of your cooler will determine which one you need; the Medium fits depths between 14.5” and 17.5”, while the Large fits depths from 17.5” to 20.5”.
Important Tip
One important tip on measuring: measure the width and depth of your cooler 2.5” above the surface it’s sitting on. Many coolers taper toward the bottom, making them slightly wider and/or deeper at this point than at their bases. And because the vertical “walls” of the cooler slide rise 2.5” above the horizontal surface where the cooler sits, this is the key measurement.
Measure the width and depth of your cooler 2.5” above the surface it’s sitting on.
Keep in mind also that if your cooler fits tightly under your leaning post without a slide, it may not fit with a slide installed. Boat Outfitters cooler slides add 2” of height, so with your cooler sitting on the deck, you’ll need a minimum of 2” of clearance between the top of your cooler and the bottom of your leaning post. You’ll also need a total of 3.5” of clearance in width. Push your cooler tight against one leg of your leaning post and make sure you have 3.5” or more between the cooler and the other leg.
The next question is what color to order. All sizes are available in White/White, Arctic White, and Seafoam. Other Starboard colors are available as special orders. Cooler slides aren’t cheap and they’re built to last a long time, so unless you already know what color Starboard matches your deck most closely, it’s probably worth the extra $20 to order a sample chain ahead of time and make sure you get the right color.
What’s In the Box
Your cooler slide will arrive mostly assembled, but there’s still a bit of work to do. In the box, you’ll find the two sides of the slide assembly itself, plus different pairs of spanners, which look like Starboard strips. Small and Large cooler slides come with two different lengths of spanners. Medium slides come with three different lengths. Once you find the right length, you can discard the other spanners (or keep them as material for future projects!).
Also in the box you’ll find (8) #8-32 x 3/4” machine screws for attaching the spanners to the slide assembly and (6) #10 x 1-1/4” self-tapping screws for attaching the slide assembly to the deck.
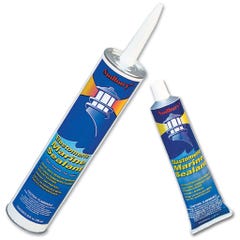
Besides tools, the only thing you need that isn’t in the box is a good quality marine sealant. Boat Outfitters always recommends elastomeric sealant, which works especially well with Starboard, but polyurethane and polysulfide sealants are fine too.
Sizing Your Slide to Fit the Depth of Your Cooler
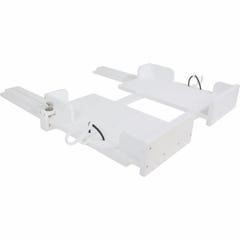
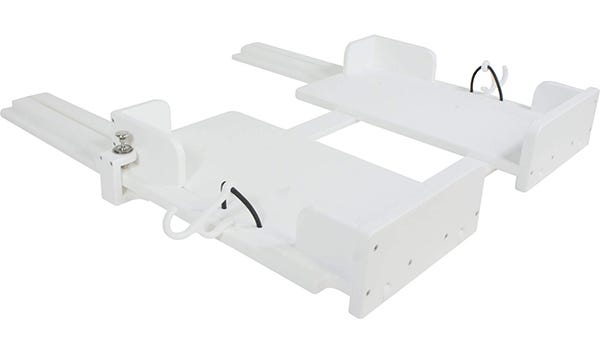
- The first step of installing a new cooler slide is adjusting it to fit your cooler tightly. Boat Outfitters cooler slides are easily adjustable in both dimensions, meaning you can get a custom-quality fit on almost any cooler.
- To fit your cooler slide, turn your cooler upside down on a flat, stable surface. Then find the front of one of the two slide assemblies (the front has a longer “wall” than the back) and position it upside down on the cooler so that the front of the slide slips down over the front of the cooler.
- Next, pull the slider part of the assembly out. This will reveal the heads of two retaining screws recessed into slots in the Starboard.
- Now, push the slide assembly tight against the front corner of the cooler with one hand while pushing the sliding “retainer” tight against the back corner of the cooler. Then tighten both of the retaining screws in their slots to lock in the depth of the slide assembly. Now, repeat the process with the other of the two slide assemblies.
Sizing Your Slide to Fit the Width of Your Cooler
- With both slider assemblies in place on the bottom of your cooler, it’s time to install the spanners. Note that the spanners don’t serve any structural purpose. Instead, they’re installation aids that make it easier to get both sides of the slide perfectly parallel. If the two tracks on a cooler slide are even a couple of degrees out of alignment, the slider will bind.
- To choose the right pair of spanners, locate the eight holes with threaded stainless inserts located on the bottom of the slider assemblies.
- Now, place one of the spanners in one of the milled slots. (This is a tight fit by design.) The correct spanner length will allow you to install all four screws through the slots in the spanner and into the threaded holes.
- Once you’ve determined the right pair of spanners to use, roughly center them across the slide assemblies and tighten them in place using the (8) #8-32 machine screws.
- At this point, your cooler slide is completely assembled, sized to fit both the width and depth of your cooler and ready to install.
Positioning the Cooler Slide Under Your Leaning Post
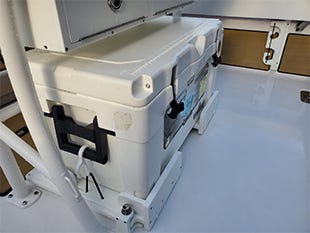
With the cooler slide sized and assembled into a single piece, it’s time to position it on deck. The best way to finalize the mounting position is with the cooler in the slide so that you can ensure proper clearance.
Remember, with your new slide, you may be able to scoot the cooler farther forward under your leaning post than it was without a slide, freeing up some cockpit space. Just make sure that it slides far enough out to fully open your cooler lid.
When positioning the cooler slide side-to-side, keep in mind that the latch assembly on the port side requires a bit of additional clearance. In other words, the port side of the slide “sticks out” farther from the cooler than the starboard side. In very tight installations, the cooler itself will sit slightly to starboard to make room for the latch assembly to port.

Installing the Cooler Slide to Your Deck
Once you’ve settled on the location for your cooler slide, you’ll need to mark and drill the six mounting holes you’ll need. This can be done with the slide in either the “closed” or “open” position. When drilling into gelcoated fiberglass, use a countersink bit or the tapered tip of a larger drill bit to carefully chamfer the brittle gelcoat in order to minimize cracking.
Another trick is to run your drill in reverse until the bit reaches the fiberglass underneath the gelcoat. If through-bolting is possible, that’s the preferred method. In most installations, though, access to the underside of the deck is very difficult or impossible, and the provided #10 x 1-1/4” self-tapping screws are more than sufficient. If you use the provided screws, drill your holes with a 9/64” bit. If the screws feel overly tight going in, step up to a 5/32” bit.
Another trick is to run your drill in reverse until the bit reaches the fiberglass underneath the gelcoat.
Remember that there may be a fuel tank underneath the deck where you’re mounting your cooler slide. Even if there’s not, take care to drill no deeper than necessary. Before drilling, place one of the provided screws in the pre-drilled hole in the cooler slide and measure how for it protrudes from the other side (roughly 1”). Then mark that depth on your drill bit with a small piece of painter’s tape.
Before driving the screws, partially fill the holes with a quality marine sealant and liberally dab sealant in a ring around the opening. Boat Outfitters recommends elastomeric sealant, which provides better adhesion on King Starboard than other sealants. (Even elastomeric sealant doesn’t provide a positive bond and should never be used instead of mechanical fasteners, but it does stick better than other sealants.) Polyurethane and polysulfide sealants are also suitable in this application.